Showing posts with label fabrics. Show all posts

Wednesday, April 26, 2023

the organization light finally came on


I've been working on putting fusible on the back of fabrics for a new commission piece in progress.

As I was folding up the fabrics to put them away, a little light went on in the back of my head and I realized there was a better way to organize these things than what I had been using.

Let's begin with the obvious --- a lot of the pieces I make are either landscapes, or aged objects.  To make these kind of pieces I use fabrics that have prints that resemble wood grains, brick, stone, grasses, etc., in a whole range of colors.

Problem was, I was still sorting everything by the rule of color --- all of the browns together, the greens together --- you know the routine.

I realized it made more sense to the way I do my work if I were to put all the "grass" looking fabrics together, like the ones on the right here
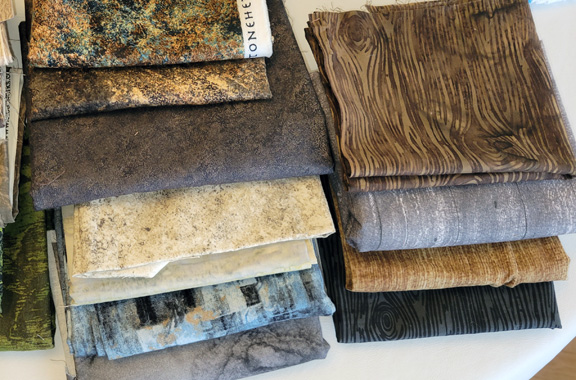
And all of the stone together (left of this photo) and the wood grains together (right of this photo).

The rest of the stash of solids and blenders will still be sorted by color (the non-texture prints/plaids/stripes were already in their own area).

I'm pretty sure this will actually make fabric selections easier, and the put away easier --- and now I'm getting excited to actually get in and sort out the many stacks of fabric that I had been putting off looking at --- YAY!!


Saturday, December 12, 2009

starting over and actual finished work

so since the first attempt at the pencil roll was a total disaster, I decided to just make it more complicated all around (doesn't that just figure?)

I found I had this nice dark blue fabric that is heavy enough without the whole lining and batting and quilting thing

but it was just so "blah"


nothing to do but to break out the rubber stamps from the other ongoing project and make some cool fabric


so I stamped a very pale gold lion on the dark blue, which will require some additional "tweeking" but is a good start

in order to stamp the wall around the lion, I put some of that blue painter's tape right over the lion stamp so I could stamp over it


then I decided a sort of rock wall overall print would be good for the rest of the fabric, so I used the stamp I created for that

and I mixed in some gray paint with the gold I had used for the lion and did the rest of the fabric

after breakfast I'll be able to peal the tape and iron the fabric to set the color

then it's on to making the pencil roll

we went to Denver yesterday to do some Christmas shopping that we can't do here in our little village

while I was in the car I did almost all of the knitting of this hat (the top 10 rows or so have to be on double point needles which I finished last night)

this hat will go with the items we purchased for a girl whose name we got from the local Giving Tree


and this is the beginning of the pair of mittens which will go with the hat

at this stage the DH says these look like a shark

(use your imagination here --- see the fin?)

one more mitten to knit then stitch them up and we'll be ready to start putting that package together too


and another project is in the works too --- we've just learned that a friend is having a baby next summer, so we're working on the design of a new quilt --- watch this space for the progress!

time to go finish that pencil case

Friday, May 08, 2009

the "eyes" have it?

The giraffe eyes are looking good!

After the first painting I decided to use some Micron markers to do the black pupil, the ring around the outside of the iris and some of the other detail because I handle a marker better than I do a paint brush

These are all ready for the clear glaze, which I plan to put on today --- then tomorrow I can get back to assembling this critter.
and talk about great timing

this picture was in our paper yesterday ---- one of the new babies at the Denver Zoo

so cute!

and gives me the kind of detail of the face that I need to work on the project I'm doing!

Guess I'll be figuring out a way to do eyelashes to go with those eyeballs!

This is the first object to be made out of the "complex cloth"

I've already made the lining/batting/top sandwich here and done the quilting both around the stamped leaves and some that is just quilted shapes in the open areas

Serious consideration is now being given to the addition of glitter puff paint use in some areas

Oh yes, this is intended to be a case for my sunglasses (the kind that go entirely over the regular glasses) -- lookin' good


Having finished up all of the numbered ladybug suit, it's on to the mushrooms

These went a bit faster --- guess I'm developing a system for creating each one in the graphics program

Having these done means I'm now over half finished with the number cards --- the face cards will definately take a bit longer --- those will all have to be hand done since each one will be different --- but I'm looking forward to those

time to get movin'

Thursday, April 23, 2009

stamping, stuffing, felting, breaking(?!)

After much fiddling with spraying of dye stuffs, etc., I decided we had reached the "point of no return" and it was time to stamp.

This is the first stamping, using the aspen leaf stamp that I cut and shading the paint from very pale yellow at one end to a sort of rusty brown at the other end.

The plan for today is to use the maple leaf, start at the dark end and stamp using a pale yellow green graduating to a sort of brick red. And to overstamp some of the aspen leafs -- at least to have some of the edges of leaves overlap.

It occured to me that if I really, really like the finished product, I can submit it to SpoonFlower and have yardage made up --- how cool is that!

No, this is not both back legs --- just one from two different angles.

The one on the left is the "side view", the one on the right is the "front view" of the first of the back legs to be stitched and stuffed.

So we now have the proverbial 3 legged stool arrangement --- I'll be working on the forth leg today


Work on the tulips for the bunny continues

The yellow one is now complete

It's a bit smaller than the first one was, and more tightly closed

And here we have the petals of the last one, all laid out on the foam felting "board" with the little white edging and the green in the center of each petal.

I'll be putting that one together today, so the bunny will be finished very, very soon!


This picture could be labeled "unintentional beach glass beginnings"

This was a bottle that got pushed to the back of the refridgerator.

It got cold enough that it froze

and broke the bottle

When everything defrosts I'll be able to pick through the glass, soak off the paper and put some of this in the tumbler in the next batch.

And the clean up wasn't too bad

I'll be packing stuff preparatory to traveling tomorrow to our daughter's house --- we hope to build a deck --- or at least get the foundation of it firmly in place --- this weekend (weather permitting!)

Tuesday, April 21, 2009

Painting and stamping and knitting (OH MY!)

The last batch of pots has been dipped and hung to dry.

So the next step will be to put the chunks of oasis in each pot and start thinking about the flowers.

The first coat of paint has been put on the cart too --- a sort of goldenrod yellow (sorry folks no picture of that yet!)


See the sort of darker spots on the fabric?

Those are the places where I stamped the resist.

I used one of my newly cut rubber stamps and did a sort of random pattern.

Today I plan to take this out on the patio table and do a fine misting with more of the concentrated orange Kool Aid.

Yesterday I saw two different things about pattern with resist --- one was an article in the last quilt magazine I got where the writer had used pieces of freezer paper cut in the desired shapes and ironed down to the fabric. The second one was on Martha Stewart where they were doing color patterning with paint --- possibly useful for items where the "hand" of the fabric isn't that important.

And then there is this

the first of the giraffe legs all stitched up and stuffed and ready to go

On the other animals I had stitched on the inside then turned and stuffed, but because this leg is so long and so narrow, I figured that technique would be a study in frustration!

So, I used a ladder stitch technique, and did alternating stitching and stuffing.

It's all ready to be attached to the body

Only 3 more to go!!


and so we're off and running on more projects --- I need to do some more wool washing so I can do some more dying for needle felting projects, so there needs to be stick picking and combing first

time to move along

Saturday, April 18, 2009

More time with the complex cloth

I decided to try to add another layer of color on the fabric since I was really not that thrilled with the very pale "mango" color that resulted after the first go round

So of course I also decided to play with a whole different technique

This is a piece of 4 inch PVC pipe

I folded the fabric in half length wise and rolled it around the pipe, then I wrapped it with thread in various places


The new "test dye" was a very strong orange mixture.

1 Tbls vinegar, 1 packet of orange Kool Aid and 24 ounces of hot water in a sports bottle

This is what it looked like after pouring the dye down the pipe


Then I bundled it up in a plastic bag and let it set for 2 hours before I rinsed and removed it from the pipe


the result is a sort of orange sherbert with some lighter sort of mango-y looking stripes

I was hoping for a more cross-hatched patterning, but that didn't happen

Possibly because there was not enough contrast in the dye colors, possibly because the tied places around the post were too narrow

While the pipe was "steeping", I mixed up a batch of potato starch resist "batter". I'm planning to use some of it and my new rubber stamps to stamp on the fabric, then I'm going to set up my airbrush and airbrush over the resist.

Should be interesting

Have finished putting the bezel around the red beach glass --- this one is another sharply angled piece, so I used the peyote band again. Today I'll start on the chain.

Thursday, March 19, 2009

Fabric and quilts and design


We've been making what I think of as art quilts for a while now.

Each of them begun with a specific gift purpose in mind (except for the angels there at the end that I plan to enter in the State Fair, but after that have no real plan for)

Each of them has been a new adventure, where I've learned a new technique, developed a new theme, etc., etc.

But there's always that issue of finding the fabric that I really want to use --- as in I know exactly what I want, I can see it in my head, but no one else has seen it yet, so no one has made it yet.

As you may recall from yesterday's post, I recently ran across a book about creating your own cloth --- not just that whole "throw it in the washer with rit dye" thing (although that is also a valid step possibility in the process), but the idea of layering techniques -- as in wash it with color then stamp it with your own hand made stamps then paint in some details then add foiling or stitching

All very exciting from the perspective of making a length of one-of-a-kind cloth

But what if I wanted, say 5 or 6 yards of the stuff, with a repeat

The possibilities of that seemed pretty remote

until I was looking at the blog of the author of the most exciting of the books I picked up

she was talking about something called Spoonflower. WOW!! You load up your artwork, you place your order, they print your fabric!!

This is very exciting, and full of amazing possibilities!!!

It boggles the mind (I may need to go lie down a while and contemplate all the things I could do with this idea!)